Mastering Multiple Language Support in React Native: Part 1

I am a fullstack developer. I have been freelancing since 2010 (coding since 2007). Over the years I have worked as a one person team where I build backends, microservices, managed large AWS infrastructure, and managed large NoSQL databases (Cassandra, MongoDB, and ElasticSearch). Being a pre-nosql revolution programmer, I still love PostgreSQL, and MySQL as a sharp knife in my toolbelt.
After 2015, I have started taking small and medium size projects and MVPs for startups and businesses, and delivered complete solutions to them. The deliverables included in these projects are: mobile apps (React Native), desktop apps (Electron), webapps (React), resilient backends (NodeJS, MongoDB/DocumentDB, DynamoDB, Firestore, Cassandra), and infrastructure/IaC (Terraform).
I am interested but have no experience in the following tech: ML, Blockchain, Gene Editing, Rust, CRISPR.
Oh, I also authored a couple editions of Mastering Apache Cassandra book as single author.
This post was originally published on Medium by me on July 21, 2020
This article runs in three parts. If you are looking for code, please use part_1 branch of this repo: https://github.com/naishe/rn_multilanguage
The second part can be accessed at https://medium.com/cybermonkey/mastering-multiple-language-support-in-react-native-part-2-d33262acc21d
Part 3 is here: https://medium.com/cybermonkey/mastering-multiple-language-support-in-react-native-part-3-d8091339c767
If you are serving a multilingual audience through your app, it becomes quickly obvious that supporting the languages of the demography will give you an edge over the singular language app. Working on ThatMate’s mobile app that serves sexual and mental health education to children and young adults in India, we came to realize that we will have to support multiple Indian languages along with English sooner than later. Luckily, for us, the React Native ecosystem makes it really simple. This article will explain how we did it.
Please be aware that fully localization is much more than just multiple language support, it includes currency conversion, date and time format, RTL (right to left) language and UI direction support, calendar type, timezone, whether they use metric system, and temperature unit among other things. This article is about supporting multiple languages, however, it can easily be extended to provide full localization support.
NOTE: This tutorial assumes that your project is created using React Native CLI (as in npx react-native init AwesomeProject ). If you are using Expo, there is an excellent guide on Expo website https://docs.expo.io/versions/v38.0.0/sdk/localization). The Expo guide uses the i18n-js library for internationalization. If you want to use i18next, you will have to use expo-localization instead of react-native-localization as the dependency.
If you are trying this on a fresh project, create a new React Native project:
# Initialize a new React Native project
npx react-native init rn_multilanguage --template react-native-template-typescript
# Go to the directory generated
cd rn_multilanguage
#Install dependencies
npm install --save i18next react-i18next react-native-localize @react-native-community/async-storage
Where the installed libraries are:
react-native-localize: The library that provides helper functions to figure out the device’s localized preferences like languages, timezone etc. Read more here: https://github.com/react-native-community/react-native-localize
i18next: Our internationalization library. Read more about this here: https://www.i18next.com/
react-i18next: This library provides nice binding with React and React Native projects using hooks, higher order components and also providers Trans — translator component. Read more about it here: https://react.i18next.com/
@react-native-community/async-storage: Local storage library, we will use this library to persist the language preference over app restarts
Now that we have our workspace set up, let’s start coding. In general, this is what we want:
- Initialize internationalization at the beginning of the app
- Check user’s stored language preference, and show the content in that language
- If this is the first time user launching our app or there is no language preference saved, find the best suited language for the user by providing all supported languages and looking into device’s language preference
- If no matching language is found in step fallback to default language
Initialize i18next for React
Let’s break this code down:
Line #46 to #68 is where the initialization is happening. We are passing a custom language detector to be used. Also, passing initReactI18next from react-i18next to enable React and i18next integration. Then we pass the initialization settings.
Initialization has three parts:
Resources: A JSON object that contains the supported language codes and for each language code, we have a key and the equivalent translation in that language. In the code snippet, we have two language codes: en for English and hi for Hindi. We have added the same keys to both the languages and the associated values are the representation of that key in the respective languages. So, if you do t("Welcome to React") the users with Hindi preference would see “रियेक्ट तथा रियेक्ट-आई १८ एन में आपका स्वागत है” and the users with English as their preference would see “Welcome to React and react-i18next”.
You might be thinking that this way of setting translation will quickly become unwieldy. And, perhaps what if you want to organize the translations in a more nested way, or maybe how gender or pluralization could be handled? Worry not. Let’s get through the basics, then we will see how we can make our life much easier by keeping translations in separate files and how to use nesting.
React: React specific settings go here. I have disabled suspense here. Otherwise, you will get a warning in the lines of
Exception has occurred: Error
Error: I18nextWithTranslation suspended while rendering, but no fallback UI was specified.

Add a <Suspense fallback=...> component higher in the tree to provide a loading indicator or placeholder to display.
You will either have to wrap your components in <Suspense> tag like it is suggested here: https://react.i18next.com/latest/using-with-hooks#translate-your-content or you can disable Suspense like I did.
Interpolation: i18next provides you to use template strings and interpolate them at the render time. For example the following translation can be evaluated dynamically
{
 "sayMyName": "My name is {{ name }}"
}
When you do the following:
i18next.t("sayMyName", "<Nishant>")
// returns: My name is <Nishant>
This is to avoid XSS attacks. Read more here: https://www.i18next.com/translation-function/interpolation#unescape
However, in React Native we do not have this issue. We want strings to be rendered as is. So, we want the last interpolation to return us “My name is ” and for that, we want to turn off the escapeValue.
Now that we know how to initialize i18next. Let’s check out how to detect the user language. And, that is the fun part.
I18next follows a middleware plugin sort of architecture. If you have used Express.js, you might be familiar with the concept. In essence, the library exposes a specification, inputs to the plugin and expected outputs from the plugin. In our case, our plugin code spans from line #10 to line #44.
We specify that it is a languageDetector plugin (#11), the detection happens asynchronously (#14). At #15, it provides you with various objects that might be required for your plugin to initialize. I left it empty because I did not need it, but I mentioned it here in case you wanted to do something. Then comes the meat of the code, the detect function. Detect function is provided with a callback function that takes the detected language. Note that the callback function is passed when we mention async is true. If your detection is synchronous, then you can set async:false and return the language code from the detect function. Let’s dig into this detect function, shall we?
At line #23, we look into the AsyncStorage for previously stored language code. I know that I have stored it with the key APP_LANG (I will tell you later where I store the user preference, for now assume that language code is stored in APP_LANG and APP_LANG is a name I provided. You can use your own key if you did not like it). If fetching the language code errors out or returns a falsy value, we will try guessing the user’s preference.
Guessing User’s Language Preference: It only makes sense to suggest a language if we somehow get a list of user’s acceptable languages prioritized by users preference for those languages and compare that list with the languages that we provide for the app and then find which language fits the best. Luckily for us, React-Native-Localize has a tool that does exactly that.
At line #33,
const bestLng = RNLocalize.findBestAvailableLanguage(\['en', 'hi'\]);
We ask react-native-localize to find the best suitable language among the provided language codes by comparing it with the user’s system language preference. In the case shown in the screenshot below, the function will return “hi”, Hindi, as the best language.
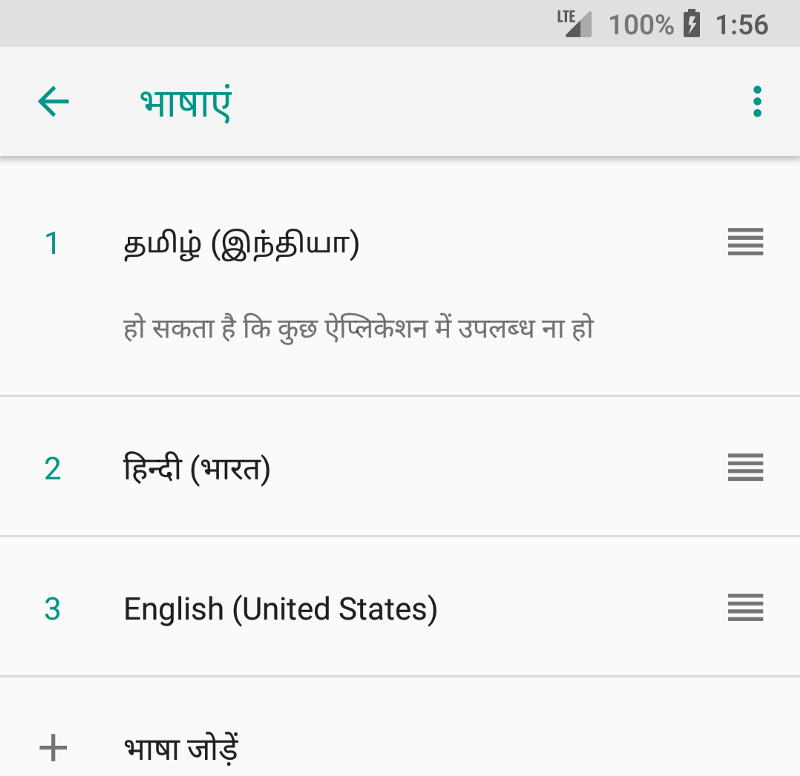
☝️ User’s Language Preference: Tamil first, Hindi second, and English third
In case there is no common language between the list of languages you support and the list of languages in the user’s language preference, RNLocalize.findBestAvailableLanguage returns undefined and that is our clue to return the fallback language. In our case, we are returning en, English, as our fallback language at line #35.
Lastly, if it is a sunny day, the stored language will be fetched from local store and we will return this as I did at line #38.
Storing User Language Preference: My favorite part of the plugin is the cacheUserLanguage method, because it centralizes the logic to store user selection. This method is called every time after detect is called and, as we will see later in this post series, when the user opts to change the language.
Step 2: Integration with the App
At this point, we have configured i18next to work with React to guess the best language and to store the selected language permanently. What’s the wait? Let’s integrate with our React Native code. It’s as simple as importing this file in the application main entry file, which is, for most of us mortals, either App.tsx or App.jsx.
At this point our app looks like this:

☝️ Automatically selected Hindi and served the content
Are we done yet? Well, almost. We haven’t given a way to change the language. Neither have we looked at how to split translations in different files. How to interpolate, and how to return an object or array of strings. We do not know how to handle gender specific sentences or plural and singular sentences. Let’s take a break. And continue this in the next article.
Part 2: https://medium.com/cybermonkey/mastering-multiple-language-support-in-react-native-part-2-d33262acc21d
Part 3: https://medium.com/cybermonkey/mastering-multiple-language-support-in-react-native-part-3-d8091339c767
#React #ReactNative #Internationalization #i18n