Mastering Multiple Language Support in React Native: Part 2

I am a fullstack developer. I have been freelancing since 2010 (coding since 2007). Over the years I have worked as a one person team where I build backends, microservices, managed large AWS infrastructure, and managed large NoSQL databases (Cassandra, MongoDB, and ElasticSearch). Being a pre-nosql revolution programmer, I still love PostgreSQL, and MySQL as a sharp knife in my toolbelt.
After 2015, I have started taking small and medium size projects and MVPs for startups and businesses, and delivered complete solutions to them. The deliverables included in these projects are: mobile apps (React Native), desktop apps (Electron), webapps (React), resilient backends (NodeJS, MongoDB/DocumentDB, DynamoDB, Firestore, Cassandra), and infrastructure/IaC (Terraform).
I am interested but have no experience in the following tech: ML, Blockchain, Gene Editing, Rust, CRISPR.
Oh, I also authored a couple editions of Mastering Apache Cassandra book as single author.
This post was originally published on Medium by me on July 22, 2020
This article runs in three parts.
If you are looking for the code for part 2, checkout part_2 branch of the GitHub repo at https://github.com/naishe/rn_multilanguage
In the last part, we have got the basics of multiple language support done. We could set up a project, guess the best possible language, store and retrieve language preference and display content in the language. It sounds like we are done, but for any serious medium to large project, there are a bunch of things you want to do to avoid pulling your hair over the course of app development. In this article, we will do some advanced things. Here is the list of things we will do:
- Splitting the translations into manageable files and move the JSON away from the config file
- Allow users to change the language and apply it across the app
- [Let’s leave it for part 3] Rendering dynamic strings using features such as interpolation, formatting, setting timezone locale, pluralization, nesting, context, and JSON objects and arrays
Organizing translations: Namespaces and Deep Objects
What to want when it comes to organizing translations? We want each language to have its own directory, and we want translations to split in multiple files. Maybe, I want to have a “common” file that has translation for commonly used texts like OK, Cancel, Back, and so on. I also want one file for each screen, so I want translations for Home screen in home file, and Settings screen in settings file. So, this is what I want as far as folder structure is concerned

☝️ Folder Structure of Translation Files
Where my common.ts, homePage.ts, and index.ts looks as follows:
☝️ common.ts, homePage.ts and index.ts for English (en)
So, essentially, when we import en from './en', we get a JSON that looks like:
{
 common: {
  ok: "OK",
  cancel: "Cancel"
 },

 homePage: {
  welcome: "Welcome to i18Next!"
 }
}
In i18n lingo, common and homePage are called namespaces. And, we can refer to the contents of a namespace by referring to the key with the namespace as prefix with colon as separator. So, to access ok key from common namespace, we need to do the following, t('common:ok') and it will render the value of ok from the selected language’s common file.
What if we want another layer of grouping? What if we want to group translation of a dialogue box component within the home page. Like this:
{
 homePage: {
  welcome: "Welcome to i18Next!",
  title: "An unnecessarily lengthy tutorial",

  dialogue: {
   title: "An unnecessary dialogue box",
   close: "Go back to home page"
  }
 }
}
We can use dot notation to traverse through the nested JSON object. Here, t("homePage:title") will return "An unnecessarily lengthy tutorial" and t("homePage:dialogue.title") will return "An unnecessary dialogue box".
Now that the file organization and nested translation is sorted out, we are mostly OK with it. But, wouldn’t it be good if we do not have to type namespace for the most commonly used namespace? It would be so nice, if we could, just do t(“cancel”) and we get the value from the common namespace. Well, we are in luck. We can specify default namespace in configuration and for all the cases where a namespace is not mentioned it will look into default namespace.
At this point, out i18next configuration looks like this:
And, a code looks like this,
<Text>homePage NS: {t('homePage:welcome')}</Text>
<Text>Deafult NS: {t('ok')}</Text>
 ☝️ Yeah, I see the typo! 😅
Allow Users to Switch Language
It will be a powerful display of your confidence if you choose a user’s preferred language for them and not let them choose the language they want your app to be. But, we do not live in that kind of world where installing an app is a long term commitment. So, we need to provide a way to let user change the language and it is as easy as calling i18n.changeLanguage(“YOUR_LANGUAGE_CODE”)
When you call changeLanguage it changes language for the whole application at the same time, the cacheUserLanguage is also called with the language code of the newly selected language. If you remember from the last part, this is where our logic to store the language code also exists. So, as soon as we change language, the new change gets applied and the preference is stored. Neat!
A small React Native utility component that does the whole heavy lifting for you would look like this:
And the outcome looks like this:
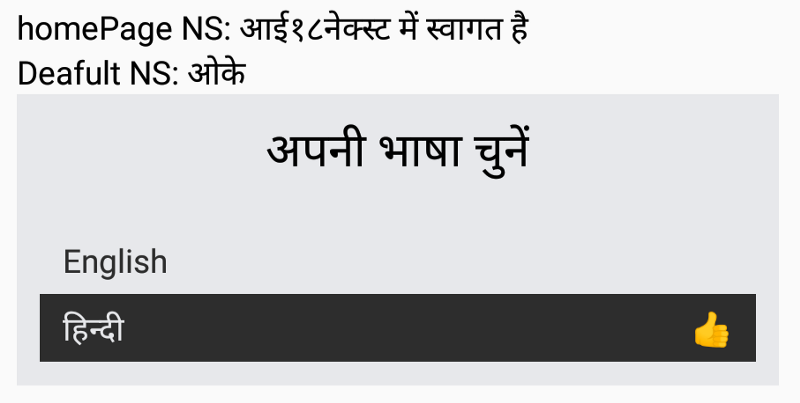
☝️ The default View (language is picked from user preference)
As you click English, the whole app changes to English and it is stored to AsyncStore for future.
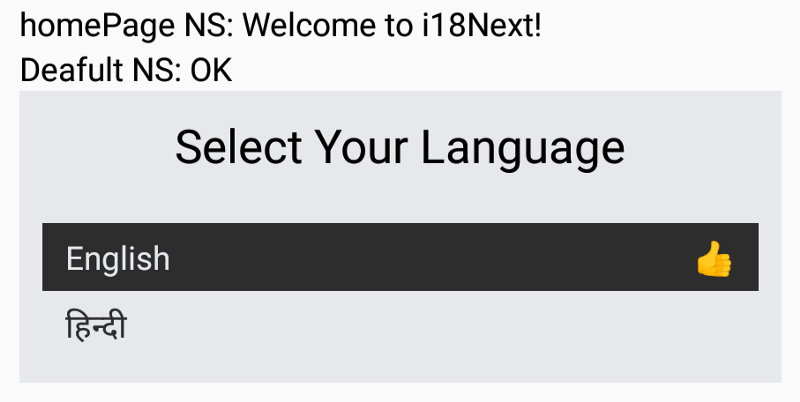
☝️ Everything is in English
Well, at this point, the majority of us are done, except for the annoying ones with their “what ifs”. A bunch of advanced features will be discussed in part 3. Hope to see you there.